Spread the love

Handmade jewelry is the ultimate expression of personal style, blending wearable art with individual craftsmanship. Designing your own necklaces allows you to experiment with rich textures, shimmering crystals, organic stones, delicate wirework, and modern geometric silhouettes. Whether you are aiming for a bohemian festival vibe, a sleek modern minimalist aesthetic, or a regal vintage statement piece, crafting custom necklaces offers endless creative possibilities.

Below is an extensive, step-by-step guide featuring 20 Amazing & Inspiring DIY Necklace Ideas, complete with detailed breakdowns of each concept, tutorials, insider tips, variations, and complete material checklists to help you build your custom jewelry wardrobe.
1. Raw Quartz Wire-Wrapped Pendant Necklace

What This Idea Means

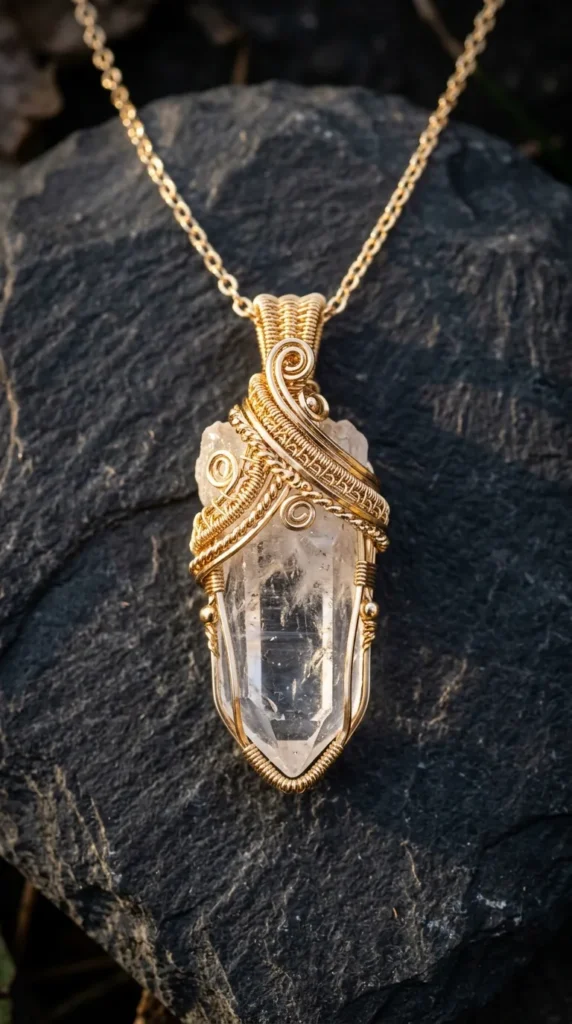
Raw quartz pendant necklaces celebrate organic, natural beauty. By wrapping an unpolished crystal point in delicate copper, gold, or silver wire, you create a rustic yet elegant focal piece that hangs effortlessly from a delicate metal chain or leather cord.

How to Make It

  1. Prepare the Wire: Cut a 12-inch piece of 22-gauge craft wire and an 18-inch piece of 26-gauge binding wire.
  2. Anchor the Base: Crisscross the thicker 22-gauge wire around the bottom base of the raw quartz point, twisting it securely to form a stabilizing basket.
  3. Wrap the Crystal: Wrap the thinner 26-gauge wire around the body of the crystal in decorative spirals, securing the stone tightly within the frame.
  4. Form the Bail: Bring the top wire ends together above the crystal point and use round-nose pliers to bend a double loop (the bail). Wrap remaining wire ends tightly around the base of the loop to lock it.
  5. Attach to Chain: Thread a dainty brass or sterling silver cable chain through the wire bail.

Tips & Variations

  • Tip: Use nylon-jaw pliers to bend wire without scratching the metallic coating off the craft wire.
  • Variation: Swap raw clear quartz for raw amethyst, rose quartz, or fluorite points to infuse rich natural colors into the design.

What You Need

  • Raw quartz crystal point
  • 22-gauge structural craft wire & 26-gauge wrapping wire
  • Round-nose pliers, flat-nose pliers, & flush cutters
  • Delicate cable chain necklace with clasp

2. Multi-Strand Pearl & Gold Chain Choker

What This Idea Means

This design merges classical elegance with contemporary edgy fashion. Layering asymmetrical strands of creamy freshwater pearls alongside delicate gold paperclip chains creates a rich, textured choker that elevates casual tees and evening wear alike.

How to Make It

  1. Measure Neckline: Cut two 14-inch lengths of gold paperclip chain and one 13-inch length of bead-stringing wire.
  2. String the Pearls: Thread small freshwater pearls onto the bead wire until it reaches 13 inches in length. Secure both ends with crimp beads and jump rings.
  3. Layer the Components: Connect one end of the pearl strand and both chain strands to a multi-strand slide clasp using 5mm gold jump rings.
  4. Attach Hardware: Attach the opposite ends of the three strands to the matching side of the multi-strand clasp, keeping the pearl strand slightly shorter so it sits nestled on top.
  5. Polish: Wipe finger oils off the pearls and polished gold link surfaces using a jewelry cloth.

Tips & Variations

  • Tip: Choose irregularly shaped rice or baroque pearls rather than perfectly round synthetic pearls for an authentic organic aesthetic.
  • Variation: Add a single coin medallion or letter initial charm dangling from the bottom chain strand.

What You Need

  • Freshwater pearls (irregular or rice shape)
  • Gold paperclip chain
  • Coated bead-stringing wire & crimp beads
  • Multi-strand slide clasp & 5mm jump rings
  • Jewelry pliers set

3. Terracotta Polymer Clay Arch Statement Necklace

What This Idea Means

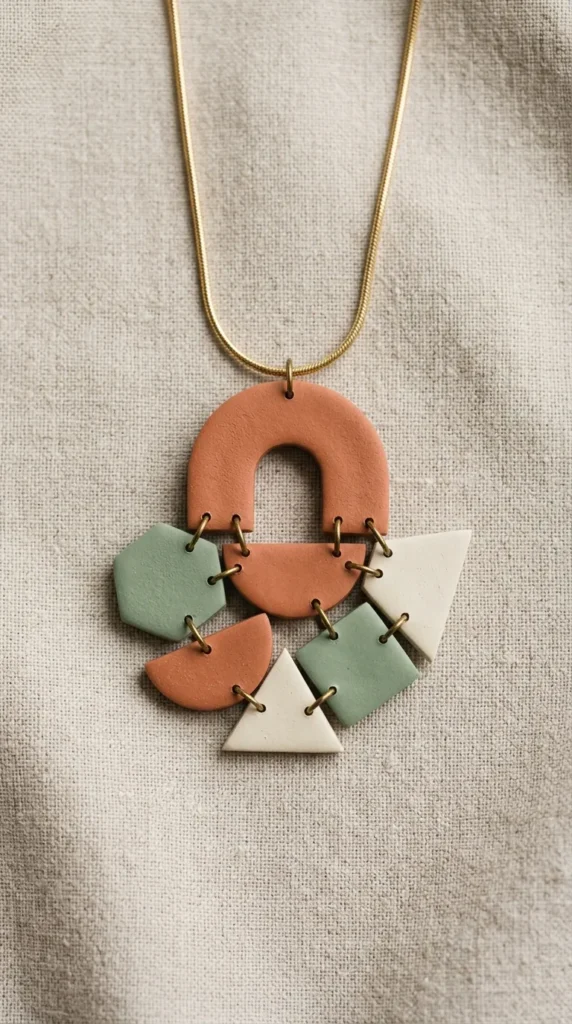
Inspired by modern mid-century architecture and desert-modern palettes, this statement piece features geometric polymer clay arches, half-moons, and circles suspended from a sleek snake chain. It offers a bold, artistic pop of color with a lightweight feel.

How to Make It

  1. Condition and Roll Clay: Condition terracotta, sage green, and cream polymer clay. Roll out to a smooth 1/8-inch thickness using an acrylic roller.
  2. Cut Shapes: Use clay cutters to stamp out nested arch shapes and circles. Use a needle tool to pierce small jump-ring holes near top and bottom edges.
  3. Bake the Clay: Bake clay cutouts on a ceramic tile according to package directions (typically 275°F for 30 minutes). Let cool completely.
  4. Sand and Assemble: Sand rough clay edges using 400-grit sandpaper. Connect clay arches and geometric pieces vertically using large brass jump rings.
  5. Attach to Chain: Pass a thin gold snake chain through the top clay arch holes or attach via jump rings to an adjustable chain.

Tips & Variations

  • Tip: Bake clay under a foil tent to prevent light-colored clay from scorching or yellowing in the oven.
  • Variation: Mix specked granite clay with matte black clay for a minimalist Scandinavian aesthetic.

What You Need

  • Polymer clay (Terracotta, Sage, Cream)
  • Polymer clay arch cutters & acrylic roller
  • Needles & 400-grit sandpaper
  • Brass jump rings & jewelry pliers
  • Gold snake chain with clasp

4. Resin & Pressed Wildflower Oval Pendant

What This Idea Means

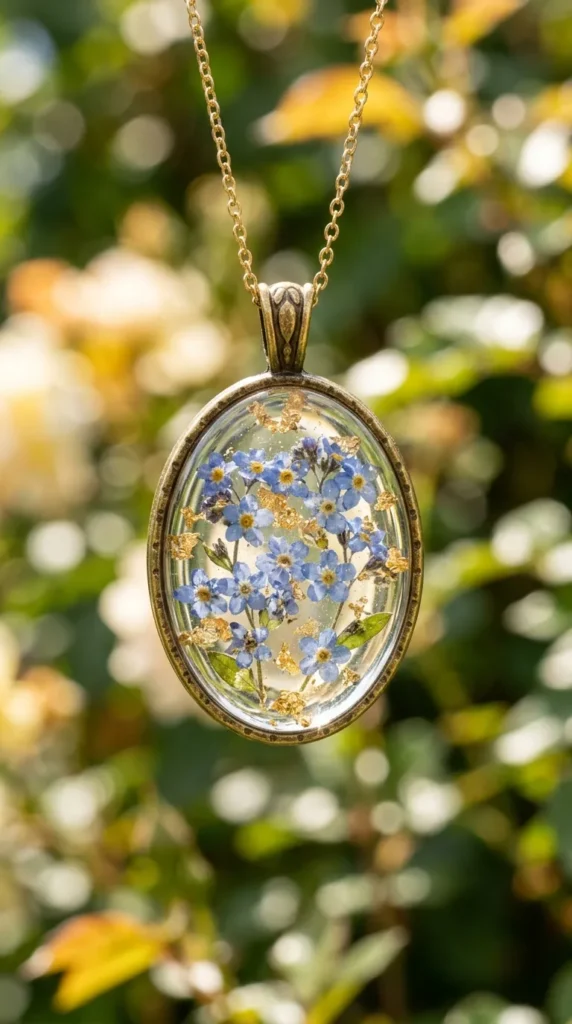
Capturing the ephemeral beauty of nature, this romantic necklace encapsulates real pressed wildflowers, green fern fronds, and tiny metallic foil flecks inside a crystal-clear UV resin oval bezel frame.

How to Make It

  1. Prepare Open Bezel: Lay a hollow oval brass bezel onto a silicone mat, pressing down firmly to ensure a tight seal.
  2. Pour Base Resin Layer: Squeeze a thin layer of UV resin inside the bezel and cure under a UV lamp for 60 seconds to form a sealed backing.
  3. Arrange Botanicals: Place tiny dried pressed wildflowers (like forget-me-nots or mini pansies) and leaf pieces onto the cured base using tweezers. Add flecks of gold leafing.
  4. Pour Top Resin Layer: Fill the bezel to the top rim with UV resin, using a toothpick to pop any micro-bubbles.
  5. Cure and Chain: Cure under the UV light for 3 to 5 minutes until hard and tack-free. Attach a jump ring and thread onto a gold curb chain.

Tips & Variations

  • Tip: Ensure dried flowers are 100% moisture-free before resin application; moisture causes resin cloudiness or brown spots over time.
  • Variation: Substitute flowers for tiny watch gears and clock hands to pivot toward a industrial steampunk design.

What You Need

  • Hollow open oval bezel pendant frame
  • Clear UV resin & UV curing lamp
  • Pressed dried mini wildflowers & gold leaf flakes
  • Silicone craft mat & tweezers
  • Gold curb chain necklace

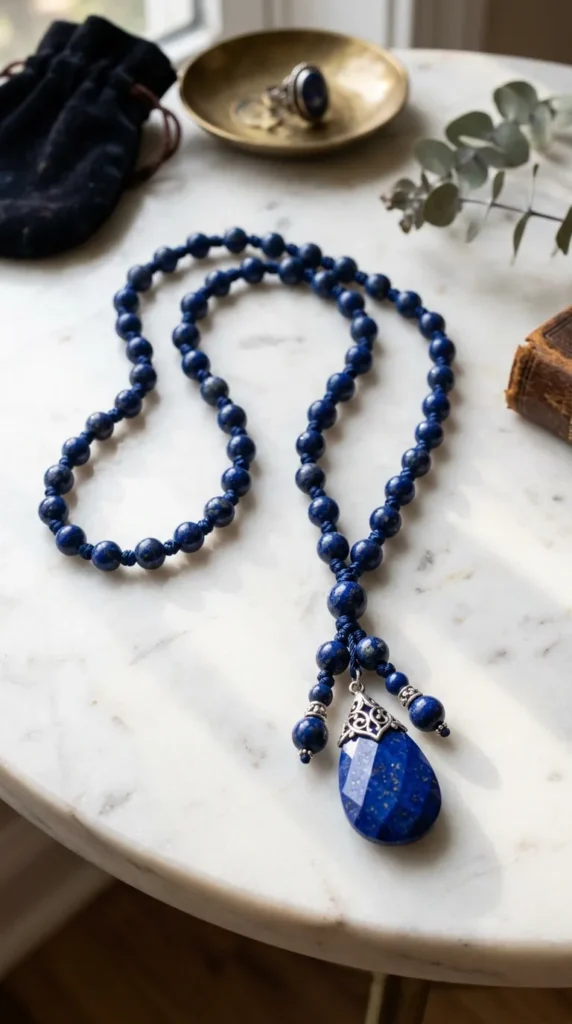
5. Hand-Knotting Silk & Gemstone Y-Drop Necklace

What This Idea Means

Y-drop (or lariat) necklaces accentuate plunging necklines with fluid vertical lines. Traditional silk bead-knotting techniques separate vibrant gemstone beads, ending in a dangling teardrop gem that sways gently with movement.

How to Make It

  1. Thread Silk Cord: Thread a needle attached to fine silk cord with 8mm round gemstone beads (e.g., lapis lazuli or labradorite).
  2. Knot Between Beads: Tie an overhand knot tightly against each bead using a knotting awl to keep beads securely separated and prevent wear.
  3. Form the Y-Junction: After knotting 16 inches of beads, pass both ends of the silk cord through a single central ring connector to create the central “Y” intersection point.
  4. Drop Strand Assembly: String 3 more beads down a single 3-inch vertical cord tail, finishing with a large faceted teardrop gemstone wire-wrapped at the very tip.
  5. Attach Clasp: Attach a gold spring ring clasp to the back ends of the silk strand.
See also  10 Small Bathroom Remodel Hacks to Make It Look Bigger

Tips & Variations

  • Tip: Use a knotting awl or large needle to push the silk knot right up against the bead hole before pulling tight.
  • Variation: Use smooth pearl beads instead of gemstones for a bridal Y-drop necklace.

What You Need

  • 100% natural silk bead cord with needle attached
  • 8mm round gemstone beads & 1 faceted teardrop gem
  • Brass ring connector & spring ring clasp
  • Knotting awl or tweezers
  • Clear bead cord glue (G-S Hypo Cement)

6. Chunky Braided Cotton & Metal Ring Rope Necklace

What This Idea Means

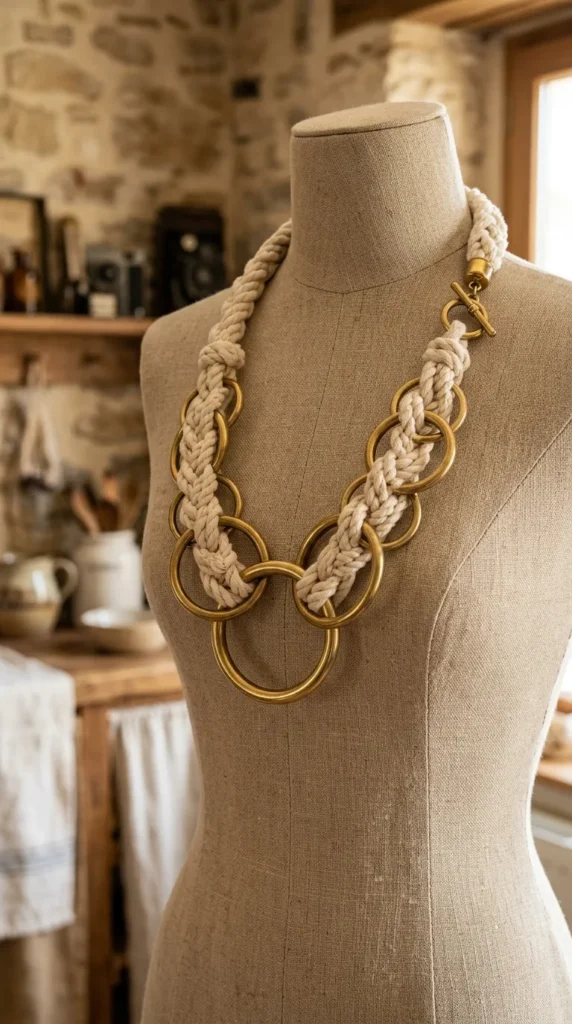
Combining textile arts with metal hardware, this tactile statement necklace features thick braided cotton cord woven through interlocked brass O-rings. It brings bold texture and modern sculptural flair to simple linen outfits.

How to Make It

  1. Cut Cotton Cord: Cut three 30-inch lengths of thick 4mm unbleached cotton cord.
  2. Anchor Top Ends: Tape top ends together onto a table using painter’s tape.
  3. Braid and Feed Rings: Begin a standard three-strand braid. Every 2 inches, slide a 1-inch polished brass O-ring onto the outer cord strand before crossing it over into the braid.
  4. Finish Braid: Continue braiding until reaching 18 inches, keeping ring placement symmetrical across the center arc.
  5. Glue End Caps: Trim cord ends, apply E6000 adhesive inside heavy brass cord end caps, and insert braided cord ends. Let cure for 24 hours. Connect a lobster clasp to the end caps.

Tips & Variations

  • Tip: Comb out the raw cotton ends extending past the end caps if you prefer a tassel finish instead of metal caps.
  • Variation: Dip-dye the center of the finished cotton braid into indigo dye for a Japanese Shibori gradient effect.

What You Need

  • 4mm unbleached cotton cord
  • 1-inch polished brass O-rings
  • Heavy metal cord end caps & lobster clasp
  • Painter’s tape & tape measure
  • E6000 craft glue

7. Vintage Locket & Cascading Charm Cluster Necklace

What This Idea Means

Romantic and nostalgic, this project centers an antique brass locket surrounded by a cluster of mismatched charms, single crystal beads, filigree keys, and small pearl drops attached along a long vintage-style brass chain.

How to Make It

  1. Prepare the Main Locket: Select a vintage oval or heart-shaped brass locket. Attach a heavy 6mm jump ring to the top bail loop.
  2. Build Charm Clusters: Create individual wire-wrapped dangles using headpins, crystal beads, small metal keys, and faux pearls.
  3. Assemble Center Intersection: Thread a long 28-inch antique brass chain. Locate the center link of the chain.
  4. Attach Locket and Charms: Connect the central locket to the center chain link. Attach 4 to 6 smaller charm dangles directly to adjacent chain links on both sides of the locket.
  5. Personalize: Insert small vintage photos or dried rose petals inside the locket compartments.

Tips & Variations

  • Tip: Mix bright metallic finishes with aged antique finishes to give the charm cluster an authentic inherited feel.
  • Variation: Add small initial letter charms to represent loved ones.

What You Need

  • Vintage brass locket frame
  • Assorted charms (Keys, crystal beads, pearls, filigree)
  • Headpins, jump rings, & 28-inch antique brass chain
  • Round-nose & chain-nose pliers
  • Micro photo prints or dried petals

8. Bohemian Leather Fringe & Turquoise Slice Choker

What This Idea Means

This festival-ready choker blends soft suede leather fringe with a striking raw turquoise stone center slice. It drapes comfortably around the neck while adding rich Southwestern textures to your outfit.

How to Make It

  1. Cut Leather Base: Cut a 12-inch strip of 1-inch wide soft brown suede leather band.
  2. Attach Center Turquoise Stone: Wire-wrap a flat turquoise stone slice with 24-gauge brass wire. Punch two small holes in the center of the leather band and wire the turquoise securely onto the leather face.
  3. Cut Fringe: Slice fine vertical fringe cuts along the bottom edge of the leather band (1/8-inch apart) using a sharp rotary cutter and ruler, leaving the top 1/4-inch intact.
  4. Attach End Hardware: Clamp wide ribbon crimp ends onto both short ends of the leather band using flat pliers.
  5. Attach Closure: Connect a lobster clasp to one crimp end and a 2-inch extension chain to the other.

Tips & Variations

  • Tip: Use a rotary cutter and metal straightedge on a self-healing mat for perfectly uniform leather fringe strands.
  • Variation: Thread small silver seed beads onto individual fringe strands, knotting the bottom of each strand to keep beads in place.

What You Need

  • Flat suede leather band (1 inch wide)
  • Stabilized turquoise stone slice
  • 24-gauge brass craft wire
  • Ribbon end clamps, lobster clasp, & extension chain
  • Rotary cutter, self-healing mat, & hole punch

9. Minimalist Gold Bar & Floating Gemstone Necklace

What This Idea Means

Sleek and understated, this minimalist piece features a horizontal polished brass or gold-filled tube bar centered with a single floating faceted gemstone bead threaded on a micro-cable chain.

How to Make It

  1. Prepare Curved Tube: Select a 1.5-inch curved brass tube noodle bead.
  2. Thread Central Gemstone: Thread a high-clarity faceted gemstone bead (like ruby, sapphire, or emerald) onto a 2-inch length of headpin wire, wrapping small loops on both sides to keep the stone centered inside or beside the tube.
  3. Assemble Horizontal Unit: Connect the gemstone unit to the curved brass tube using tiny 3mm jump rings.
  4. Attach Fine Chain: Cut two equal 8-inch lengths of ultra-fine gold cable chain. Attach one chain length to each side of the horizontal bar assembly using jump rings.
  5. Attach Clasp: Connect a delicate gold spring clasp to the outer chain ends.

Tips & Variations

  • Tip: Keep jump rings as tiny as possible (3mm to 4mm) to preserve the delicate, floating appearance of the components.
  • Variation: Align three curved tube bars parallel to each other to create a modern geometric ladder effect.

What You Need

  • Curved brass tube noodle beads (1.5 inch)
  • Faceted round gemstone bead
  • 3mm gold jump rings & fine cable chain
  • Spring ring clasp & wire headpins
  • Fine chain-nose pliers

10. Macramé Wrapped Sea Glass Pendant Necklace

What This Idea Means

Transforming ocean-tumbled sea glass into wearable jewelry without drilling holes, this project uses intricate micro-macramé knotting techniques to net the glass securely within fine waxed polyester cord.

How to Make It

  1. Cut Waxed Cord: Cut four 30-inch strands of 0.8mm Linhasita waxed polyester cord. Fold them in half to form an 8-strand working group.
  2. Knot Bottom Basket: Tie a central square knot, then separate cords into pairs. Tie alternating square knots 1/4-inch lower to create a flexible net mesh.
  3. Insert Sea Glass: Place a frosted sea glass piece inside the knot mesh, pulling cords tight around the sides to wrap the stone snugly.
  4. Knot Top Neck Loop: Gather all 8 cords above the glass and wrap them into a tight spiral whipping knot to form the top mounting loop.
  5. Braid Neck Cord: Separate remaining cord strands into two groups and braid them into a 20-inch necklace strap, finishing with a sliding knot closure.
See also  22 Cute Things to Sew and DIY Projects for Crafty Gals

Tips & Variations

  • Tip: Melt the trimmed ends of waxed cord lightly with a lighter; the wax fuses instantly to keep knots from unraveling.
  • Variation: Use smooth river pebbles or beach pottery fragments instead of sea glass.

What You Need

  • Frosted sea glass piece
  • 0.8mm waxed polyester cord (Linhasita)
  • Scissors, tape measure, & painter’s tape
  • Lighter (for fusing cord ends)

11. Sculptural Wire Spiral & Lava Stone Aromatherapy Necklace

What This Idea Means

Combining functional wellness with modern industrial aesthetic, this necklace cradles a porous black lava stone inside a hand-sculpted copper wire spiral cage. The lava stone absorbs essential oils, diffusing natural fragrances throughout the day.

How to Make It

  1. Form Wire Spiral: Take an 18-inch piece of 18-gauge solid copper wire. Using round-nose pliers, bend the wire end into a tight flat spiral disc.
  2. Pull into 3D Cage: Gently pull the center of the wire spiral upward with your fingers to extend it into a spring-like 3D cone/cage shape.
  3. Insert Lava Stone: Insert a 14mm porous black lava bead inside the center of the wire spiral cage.
  4. Secure Cage Top: Compress top wire loops over the stone to lock it in place, bending the remaining top wire into a sturdy hanging bail.
  5. Apply Essential Oil: Add 1-2 drops of lavender or eucalyptus essential oil onto the porous lava stone before threading onto a dark brown leather cord.

Tips & Variations

  • Tip: Oxydize the copper wire in a liver of sulfur bath and polish with steel wool to emphasize deep antique wire highlights.
  • Variation: Swap copper wire for sterling silver craft wire and use colored porous diffuser beads.

What You Need

  • 18-gauge solid copper wire
  • 14mm porous round lava stone bead
  • Essential oils (Lavender, Peppermint, Eucalyptus)
  • Round-nose pliers & flush cutters
  • Leather cord necklace strap with clasp

12. Asymmetrical Beaded Pearl & Lampwork Glass Medley

What This Idea Means

Playful, artistic, and modern, this trend-setting necklace embraces controlled chaos. It features an asymmetrical mix of colorful handmade lampwork glass beads, mismatched freshwater pearls, acrylic smiley beads, and polished metallic spacers on opposite sides of the neckline.

How to Make It

  1. Plan Visual Balance: Arrange beads on a bead design board, placing colorful lampwork glass beads on the left side and classic freshwater pearls on the right side.
  2. Cut Bead Wire: Cut an 18-inch piece of 49-strand coated stainless steel bead wire. Crimp one end to a jump ring.
  3. String Left Side (Glass): Thread vibrant lampwork glass beads, fruit-shaped clay beads, and brass spacers onto the wire up to the center midpoint.
  4. String Right Side (Pearls): Thread natural freshwater pearls and metallic seed beads along the remaining half.
  5. Finish Ends: Crimp the second end to a jump ring and attach a decorative toggle clasp.

Tips & Variations

  • Tip: Maintain color harmony by choosing 2-3 repeating accent colors among the lampwork glass beads.
  • Variation: Integrate small alphabet letter beads spelling words like “DREAM” or “JOY” along the bead sequence.

What You Need

  • Mixed lampwork glass beads & clay fruit beads
  • Freshwater pearls & metallic spacer beads
  • Bead design board & 49-strand bead wire
  • Crimp beads, jump rings, & toggle clasp
  • Crimping pliers & flush cutters

13. Metallic Bead-Woven Geometric Collar

What This Idea Means

Utilizing off-loom bead weaving techniques (such as peyote stitch or herringbone stitch), this necklace builds a flexible metallic collar composed of thousands of uniform Japanese glass Delica seed beads that sit flat against the collarbone like fabric.

How to Make It

  1. Thread Beading Needle: Thread a fine size 12 beading needle with 5 feet of strong fireline beading thread.
  2. Begin Peyote Stitch: Pick up an even number of size 11/0 metallic gold and matte black Delica beads to form the base row width.
  3. Weave Chevron Pattern: Weave back and forth in flat peyote stitch, adding one bead per stitch to construct a expanding V-shaped chevron band.
  4. Weave Strap Length: Continue weaving until the collar band measures 15 inches long.
  5. Attach Slide Clasp: Weave thread through the loops of a multi-ring slide tube clasp, locking threads securely with half-hitch knots and dab of bead glue.

Tips & Variations

  • Tip: Use Japanese Miyuki Delica beads because their precise cylinder shape allows beads to lock together with zero gaps.
  • Variation: Experiment with pastel rainbow color gradients for a softer geometric pattern.

What You Need

  • Japanese Delica cylinder seed beads (Size 11/0)
  • Fireline braided beading thread (6 lb test)
  • Size 12 beading needles
  • Multi-ring slide tube clasp
  • Micro thread scissors & bead mat

14. Pressed Monogram Wax Seal Pendant

What This Idea Means

Recalling old-world correspondence, this project uses metal clay or jeweler’s sealing wax pressed with antique monogram stamps to create a weighted medallion pendant that hangs from a thick gold rope chain.

How to Make It

  1. Roll Metal Clay: Roll out silver or bronze metal clay onto a silicone mat to a 2mm thickness.
  2. Stamp Monogram: Lightly oil an antique brass monogram seal stamp. Press firmly into the center of the wet metal clay to imprint a deep crest.
  3. Cut Rim: Trim outer clay edges with a circular cutter to form a wax seal shape. Punch a top hole for the bail.
  4. Dry and Fire: Let clay dry completely for 24 hours, then fire with a butane torch or kiln until organic binders burn away, leaving pure metal.
  5. Polish and Chain: Polish fired metal seal with a brass brush and burnisher. Thread onto a thick 24-inch gold or silver rope chain.

Tips & Variations

  • Tip: Dip the brass stamp in olive oil before pressing so it releases smoothly from wet metal clay without tearing edges.
  • Variation: Press real botanical leaves or lace textures into the clay instead of letters.

What You Need

  • Silver or Bronze metal craft clay
  • Antique monogram wax seal stamp
  • Acrylic roller & circular clay cutter
  • Butane craft torch & brass wire brush
  • Heavy metallic rope chain

15. Fabric-Wrapped Rope & Wood Bead Statement Necklace

What This Idea Means

An eco-friendly, lightweight fashion statement, this necklace wraps vibrant patterned silk fabric scraps around large wooden beads strung along a cotton rope core, separated by brass bead accents.

How to Make It

  1. Cut Fabric Strips: Cut long 1-inch wide bias strips from silk or cotton fabric scraps featuring vivid abstract prints.
  2. Wrap Wooden Beads: Wrap fabric strips tightly around 20mm hollow wooden beads, securing fabric ends with fabric glue inside bead center holes.
  3. Prepare Rope Base: Cut a 22-inch length of 6mm cotton rope.
  4. String Beads: Thread fabric-wrapped wooden beads alternating with large-hole brass spacer beads onto the cotton rope core.
  5. Finish End Wraps: Wrap thread tightly around the exposed rope ends to form neat end collars, gluing magnetic cord closures to both tips.
See also  14 Cozy Cherry Blossom Tree House Ideas

Tips & Variations

  • Tip: Use pinking shears when cutting fabric strips to prevent fraying along edges as you wrap beads.
  • Variation: Use monochromatic velvet fabric strips for an ultra-cozy fall/winter statement accessory.

What You Need

  • Patterned silk/cotton fabric scraps
  • 20mm hollow wooden beads
  • 6mm cotton rope & brass spacer beads
  • Fabric glue & pinking shears
  • Magnetic cord end clasps

16. Chunky Raw Amethyst & Brass Link collar

What This Idea Means

High-contrast luxury defines this design. Uncut, chunky raw amethyst stone chunks are wire-wrapped individually and linked together using thick handmade hammer-textured brass wire loops, creating a dramatic regal collar.

How to Make It

  1. Prepare Brass Wire: Cut 4-inch pieces of 18-gauge solid brass wire.
  2. Form Hammered Eye Pins: Bend one end of each wire into a loop using round-nose pliers. Flatten loops on a steel bench block using a chasing hammer for texture.
  3. Mount Raw Stones: Thread an uncut raw amethyst chunk onto each wire eye pin.
  4. Wrap Top Loop: Wrap the open wire end into a matching wrapped loop to secure the raw stone securely inside.
  5. Link Collar Together: Connect 7 to 9 stone units end-to-end using heavy 8mm brass jump rings, attaching a thick brass toggle clasp at the ends.

Tips & Variations

  • Tip: Tap wire loops gently with the rounded ball-peen side of a hammer to add a shimmering faceted texture to the metal.
  • Variation: Substitute raw amethyst for raw pyrite chunks for a metallic gold mineral look.

What You Need

  • Uncut raw amethyst stone chunks (drilled)
  • 18-gauge solid brass wire
  • Chasing hammer & steel bench block
  • 8mm heavy brass jump rings & toggle clasp
  • Round-nose & wire-cutting pliers

17. Delicate Tiered Layered Coin Charm Necklace

What This Idea Means

Layered necklaces solve the styling puzzle. This all-in-one piece connects three varying lengths of delicate gold chain onto a single clasp, featuring tiny disc coin charms along the shortest tier and a prominent stamped crest coin on the lowest tier.

How to Make It

  1. Cut Chain Tiers: Cut three gold cable chain lengths: 14 inches (short), 16 inches (medium), and 18 inches (long).
  2. Attach Top Tier Charms: Attach tiny 4mm smooth gold disc charms every inch along the 14-inch chain using micro jump rings.
  3. Attach Middle Tier: Leave the 16-inch chain plain or add a tiny single sparkling crystal drop in the center.
  4. Attach Main Medallion: Suspend a 15mm stamped coin crest medallion in the center of the long 18-inch chain.
  5. Unify on Single Clasp: Connect the left ends of all 3 chains onto a single 3-hole spacer bar, attaching a lobster clasp. Repeat for right side ends.

Tips & Variations

  • Tip: Using a multi-hole spacer bar prevents the three individual chain tiers from twisting around each other when worn.
  • Variation: Use antique silver chains and coin charms for a cool-toned bohemian coin necklace.

What You Need

  • Gold cable chain & 3-hole spacer bar connectors
  • 4mm gold disc charms & 15mm coin medallion
  • Micro jump rings (3mm) & lobster clasp
  • Chain-nose pliers & measuring tape

18. Floating Illusion Monofilament Crystal Choker

What This Idea Means

Creating the magical illusion that a sparkling crystal is floating directly on the skin, this choker uses strong transparent monofilament line paired with a single brilliant-cut Swarovski crystal drop.

How to Make It

  1. Measure Neckline: Measure around the base of the neck tightly, adding 1/2 inch for comfort (typically 14 inches).
  2. Cut Monofilament: Cut a 16-inch piece of clear 0.5mm nylon monofilament cord.
  3. Thread Crystal Bail: Thread a large faceted crystal teardrop fitted with a gold pinch bail onto the center of the cord.
  4. Attach Crimp Ends: Thread a tiny crimp bead and a gold jump ring onto one end of the cord. Loop cord back through crimp bead and crush tight with crimping pliers.
  5. Attach Clasp: Cover crimp bead with a crimp cover. Attach a lobster clasp to one jump ring and an extension chain to the opposite side.

Tips & Variations

  • Tip: Use a hairdryer on low heat to flatten any circular coils out of new monofilament cord before assembling.
  • Variation: Thread tiny floating seed pearls every inch along the monofilament cord for a floating pearl choker.

What You Need

  • 0.5mm clear nylon monofilament cord
  • Faceted crystal teardrop with pinch bail
  • Micro crimp beads & crimp covers
  • Jump rings, lobster clasp, & extension chain
  • Crimping pliers & measuring tape

19. Upcycled Silk Scarf & Chain Statement Collar

What This Idea Means

Interweaving vintage patterned silk neck scarves through chunky oversized aluminum or brass curb chain links yields an opulent, high-fashion statement collar that feels soft against the skin.

How to Make It

  1. Prepare Chain Base: Cut a 16-inch section of wide 15mm open-link metal curb chain.
  2. Prepare Silk Scarf: Twist a colorful 20-inch square silk scarf into a thin rolled rope.
  3. Weave Scarf Through Links: Weave the rolled silk scarf in and out through every open link along the curb chain length.
  4. Tie End Knots: Allow 2 inches of silk fabric to extend past both chain ends. Tie decorative overhand knots in the silk fabric right at the final chain links.
  5. Tie Closure: Leave remaining silk tails long so the necklace can be tied into a soft bow behind the neck for an adjustable closure.

Tips & Variations

  • Tip: Choose aluminum chain links rather than heavy iron so the large collar remains comfortable and lightweight around the neck.
  • Variation: Swap silk scarves for velvet ribbon strips during colder winter months.

What You Need

  • Wide open-link metal curb chain (15mm link size)
  • Vintage patterned silk square neck scarf
  • Scissors & tape measure

20. Sculptural Polymer Clay & Gold Leaf Pebble Necklace

What This Idea Means

Mimicking tumbled river stones and gilded marble, this artistic necklace strings lightweight organic polymer clay “pebbles” detailed with gold leafing onto an adjustable leather cord.

How to Make It

  1. Roll Clay Pebbles: Roll polymer clay into asymmetrical pebble shapes of varying sizes (from 15mm to 30mm).
  2. Apply Gold Leafing: Press sheets of gold leafing onto select sides of raw clay pebbles, rubbing gently to create cracked marble veins.
  3. Pierce Bead Holes: Pierce generous center holes through each pebble using a thick knitting needle.
  4. Bake and Sand: Bake pebbles on a baking tray according to clay package directions. Once cool, buff uncoated clay sections with 600-grit sandpaper for a smooth matte finish.
  5. Assemble on Cord: String pebbles onto a 30-inch adjustable leather cord, knotting sliding sliding knots at the ends for variable length wear.

Tips & Variations

  • Tip: Buffing baked polymer clay with a denim fabric scrap gives the clay a natural satin sheen without needing liquid varnish.
  • Variation: Add real crushed turquoise chips embedded into the clay pebbles before baking.

What You Need

  • Polymer clay (White, Charcoal, Granite)
  • Gold leaf sheets
  • Thick knitting needle & 600-grit sandpaper
  • Denim cloth scrap
  • 2mm round leather cord