Spread the love

Transforming a bathroom from a purely utilitarian space into a serene, high-end sanctuary comes down to thoughtful curation, intentional textures, and statement focal points. While tile, marble, and polished hardware set the foundational palette, wall art introduces personality, warmth, and visual balance. Modern bathroom wall art bridges the gap between clean architectural lines and tactile comfort, turning stark surfaces into curated design moments.

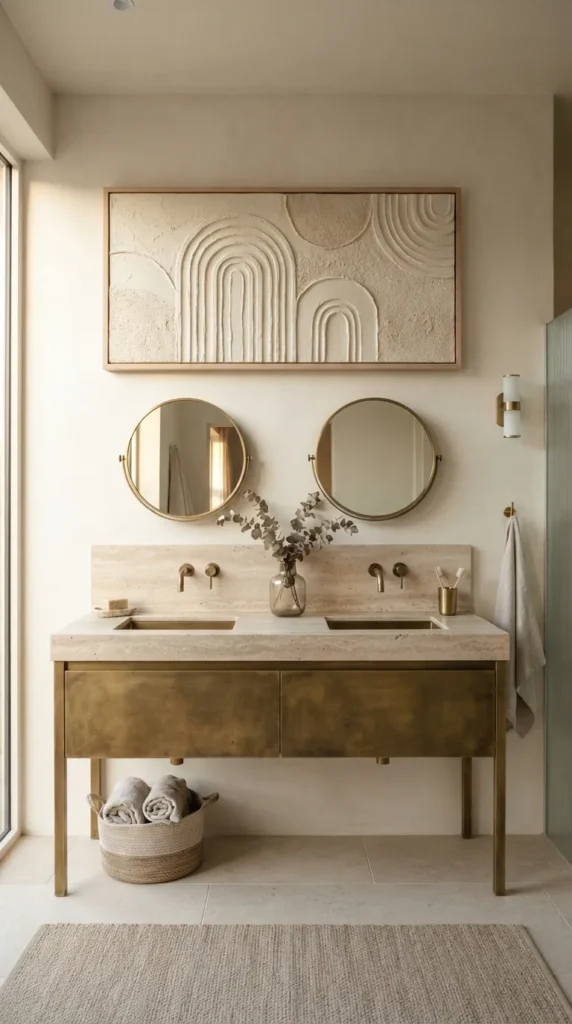
1. Minimalist Sand & Joint Compound Relief Panel

Tactile, sculptural art brings subtle depth to minimalist bathrooms without visual clutter.

  • Introduction: Textured relief panels transform monochrome walls by interacting directly with natural and vanity lighting. Instead of introducing competing hues, these panels create visual rhythm through raised ridges, geometric arches, and gentle sweeping curves.
  • What This Idea Means: This concept uses textural depth rather than color to define a space. It complements stone basins, brass fixtures, and concrete finishes by echoing organic stone textures in a refined, modern medium.
  • How to Make It:
    1. Secure a heavy-duty primed canvas or a rigid MDF board cut to your desired dimensions.
    2. Mix premixed lightweight drywall joint compound with fine silica sand at a 4:1 ratio for added grit.
    3. Apply the paste across the board using a wide plastering trowel at an even depth of 0.5 cm.
    4. Drag a notched adhesive spreader, a wide-tooth comb, or an arched silicone squeegee across the wet surface in fluid, continuous motions to etch directional grooves.
    5. Allow to cure completely for 48 hours in a dry environment.
    6. Seal with two coats of matte acrylic sealer to protect against humidity.
  • Tips and Variations:
    • Variation 1: Blend powdered warm beige or terracotta pigment directly into the compound for an earthy, uniform tint.
    • Variation 2: Frame the cured panel in a slim, untreated white oak float frame to add architectural definition.
    • Maintenance Tip: Always ensure the back of the MDF or canvas is sealed with waterproof primer to prevent humidity warping over time.
2. Moisture-Resistant Preserved Mood Moss & Fern Mosaic

Biophilic wall art brings living textures indoors without the maintenance of live garden walls.

  • Introduction: Preserved greenery panels introduce lush, forest-floor botanicals into sterile bathroom environments. Because the moss and ferns are naturally preserved with vegetable glycerin, they maintain vibrant color and soft textures without watering or direct sunlight.
  • What This Idea Means: Biophilic design reduces stress and enhances well-being. A preserved moss mosaic acts as a living tapestry, softening the hard edges of porcelain, polished stone, and glass enclosures.
  • How to Make It:
    1. Cut a sheet of marine-grade plywood to size and paint it deep forest green with water-resistant acrylic paint.
    2. Assemble preserved sheet moss, bun moss (cushion moss), and preserved delicate maidenhair fern fronds.
    3. Apply industrial-grade waterproof silicone adhesive or high-strength hot glue across small sections of the board.
    4. Press dense clumps of bun moss firmly onto the board to create elevated, mound-like topography.
    5. Fill the negative spaces with flat sheet moss, tucking the edges beneath the bun moss.
    6. Inset preserved fern sprigs and slate rock slivers into the crevices for layered, natural realism.
  • Tips and Variations:
    • Variation 1: Build the moss inside an elongated black aluminum channel frame for a streamlined, modern look.
    • Variation 2: Create a circular tondo art piece to break up repetitive vertical tile patterns.
    • Placement Tip: Keep preserved moss walls outside the direct spray path of the shower to prevent water from washing out the glycerin preservative.

3. Oversized Black and White Architectural Triptych

High-contrast architectural photography introduces dramatic scale and depth to modern bathrooms.

  • Introduction: A three-panel triptych featuring bold, monochrome architectural lines elevates an empty wall into a gallery-like focal point. The continuous imagery across multiple frames expands perceived room dimensions and complements minimalist design schemes.
  • What This Idea Means: This approach brings structural rhythm and urban sophistication to clean, contemporary spaces. The stark black-and-white tones harmonize effortlessly with matte black fixtures, crisp subway tiles, and light marble veining.
  • How to Make It:
    1. Select a high-resolution photograph of brutalist concrete curves, sweeping bridge spans, or classical archways.
    2. Crop the image into three equal vertical sections with balanced negative space.
    3. Print the segments on heavy 310 gsm archival matte rag paper using waterproof pigment inks.
    4. Mount each print inside an ultra-slim, matte black aluminum frame fitted with anti-reflective, moisture-sealed UV museum glass.
    5. Space the three frames precisely 5 cm apart along a horizontal centerline using a laser level.
  • Tips and Variations:
    • Variation 1: Choose abstract spiral staircase perspectives to add organic motion to strict linear layouts.
    • Variation 2: Use wide, off-white archival matboards around smaller prints to emphasize negative space.
    • Hanging Tip: Hang the triptych directly across from your main vanity mirror to double the visual depth of the room.

4. Floating Brass Geometric Sheet with Patina Accents

Hand-oxidized metal panels add warmth, reflective light, and luxurious craftsmanship to modern walls.

  • Introduction: Metal wall hangings bridge the gap between fine art and industrial craft. Raw brass sheets treated with targeted oxidation techniques yield deep verdigris blues, burnt ambers, and charcoal tones, catching ambient light through steamy glass.
  • What This Idea Means: Metallic art harmonizes with plumbing fixtures while introducing warm, reflective depth. The contrast between brushed, raw brass and deep, organic oxidation mimics natural mineral formations.
  • How to Make It:
    1. Source a 1.5 mm thick raw brass sheet cut to your desired dimensions (e.g., 60 x 90 cm).
    2. Clean the metal surface thoroughly with acetone to eliminate grease and manufacturing oils.
    3. Mask off clean geometric angles, arches, or split-horizon lines using heavy-duty vinyl tape.
    4. Sponge an oxidizer solution (such as a mixture of vinegar, salt, and ammonia) over the exposed brass.
    5. Allow the patina to develop for 4 to 8 hours until rich verdigris and turquoise hues appear.
    6. Rinse with distilled water, let dry, and seal with high-grade clear satin metal lacquer.
    7. Affix rear wall standoffs that project the panel 2.5 cm out from the wall.
  • Tips and Variations:
    • Variation 1: Combine brass and brushed blackened steel in split overlapping sheets for enhanced textural depth.
    • Variation 2: Conceal a waterproof LED light strip behind the floating panel to cast a warm glow across surrounding tiles.
    • Installation Tip: Anchor standoffs directly into wall studs or heavy-duty anchors to safely support the solid metal sheet.

5. Smoked Glass & Gold Leaf Abstract Diptych

Layered transparency, reflective gilding, and moody tones create a sophisticated, spa-inspired aesthetic.

  • Introduction: Smoked glass art combines deep charcoal tones with genuine gold leafing. By applying pigments and leafing to the back of tinted tempered glass (reverse glass gilding), the surface retains a high-gloss finish while housing intricate interior depth.
  • What This Idea Means: This concept plays with light, translucency, and luxury. The interaction between luminous gold leaf and smoky glass creates a moody, jewel-box ambiance that pairs well with backlit mirrors and dark slate or quartzite tiles.
  • How to Make It:
    1. Order two matching panels of custom-cut, pencil-polished tempered smoked gray glass.
    2. Clean the back surface thoroughly with isopropyl alcohol.
    3. Paint fluid, abstract gestural strokes across the back using clear water-based gilding size (adhesive).
    4. When the size reaches a tacky consistency (15–20 minutes), lay 24k gold leaf sheets over the lines.
    5. Burnish with a soft squirrel-hair mop brush and brush away loose gold flakes.
    6. Back the gilded design with a thin, spray-applied coat of semi-translucent charcoal glass paint to lock in the leafing.
    7. Install using brushed-brass edge clamps or slim channel frames.
  • Tips and Variations:
    • Variation 1: Swap yellow gold leaf for silver or palladium leaf to complement chrome and nickel tapware.
    • Variation 2: Add soft watercolor washes of white alcohol ink along the edges for a cloudy, atmospheric effect.
    • Safety Tip: Always specify tempered safety glass with polished edges when sourcing panels for high-humidity areas.
See also  21 Design Secrets For Compact Bathrooms

6. Woven Neutral Linen & Jute Fiber Art Tapestry

Natural fibers introduce tactile warmth, softness, and acoustic dampening to hard tile surfaces.

  • Introduction: Modern bathrooms often feature stone, porcelain, glass, and metal, which can result in an echoey, cold room. A structured, minimalist woven tapestry introduces tactile fiber textures, grounding the space in organic simplicity.
  • What This Idea Means: Modern fiber art focuses on negative space, varied yarn densities, and geometric forms rather than busy patterns. It softens hard architectural angles and creates a calming, tactile balance.
  • How to Make It:
    1. Set up a simple wooden frame loom warped with strong, unbleached cotton warp thread.
    2. Weave a foundation of hand-spun raw ivory merino wool roving, thick natural jute twine, and braided linen cord.
    3. Use varying tapestry techniques—such as dense plain weave, Soumak braids, and loop pile rya knots—to build layered geometric zones.
    4. Keep the palette neutral: cream, unbleached taupe, wheat, and charcoal.
    5. Carefully cut the warp threads and tie them onto a sleek, solid walnut or blackened oak dowel.
    6. Treat the completed textile with a non-aerosol fabric water-repellent spray to prevent moisture absorption.
  • Tips and Variations:
    • Variation 1: Integrate polished travertine or raw stoneware beads along the fringe to connect with surrounding stone elements.
    • Variation 2: Keep the weave strictly uniform and mount it flat inside an acrylic shadow box for a cleaner, modern finish.
    • Ventilation Note: Ensure your bathroom has adequate fan ventilation to keep natural fibers dry between uses.

7. Framed Vintage Botanical Cyanotype Prints

Deep Prussian blue sun-prints offer an elegant alternative to conventional botanical artwork.

  • Introduction: Cyanotype is an early photographic printing process that produces deep cyan-blue silhouettes. When used to capture modern botanical specimens, these prints provide a timeless, artisanal balance between history and contemporary design.
  • What This Idea Means: The striking Prussian blue pigment serves as a vibrant accent against neutral bathroom palettes. It pairs naturally with clean white tiles, warm oak vanities, and unlacquered brass hardware.
  • How to Make It:
    1. In subdued light, coat 300 gsm hot-pressed watercolor paper with a standard cyanotype sensitizer solution (potassium ferricyanide and ferric ammonium citrate).
    2. Allow the sensitized paper to dry thoroughly in a dark room.
    3. Arrange pressed botanical specimens (e.g., eucalyptus stems, monstera leaves, or wild ferns) over the paper.
    4. Secure under a heavy pane of glass and expose to direct midday sunlight for 5 to 15 minutes.
    5. Wash the print in running cold water until the runoff is clear, then immerse in a diluted water bath with a dash of hydrogen peroxide to instantly oxidize the blue to its deepest tone.
    6. Let dry flat, then frame within double-pane glass floating frames.
  • Tips and Variations:
    • Variation 1: Tone the prints in green tea or black coffee baths after rinsing to shift the cyan blue to sepia, olive, or charcoal-black.
    • Variation 2: Frame a series of four matching square prints in a neat 2×2 grid to balance tall ceilings.
    • Paper Care: Use 100% cotton rag paper to prevent warping when the print is exposed to ambient bathroom humidity.

8. Concrete & Terrazzo Geometric Wall Medallion

Industrial concrete and vibrant terrazzo aggregate form a resilient, sculptural art feature.

  • Introduction: Cast concrete and terrazzo medallions merge sculpture with graphic wall decor. Made from durable cast stone, these pieces are inherently moisture-proof, making them ideal for high-humidity and wet-zone bathroom walls.
  • What This Idea Means: This concept celebrates structural materials. By combining concrete with colorful marble chips, crushed quartz, and glass fragments, you turn industrial elements into an artistic centerpiece.
  • How to Make It:
    1. Construct a shallow circular or arched silicone mold using structural foam and silicone rubber casting compound.
    2. Mix high-strength white Portland cement with fine sand, acrylic fortifier, and marble aggregate chips (such as Thassos white, Verde Alpi green, and Nero Marquina).
    3. Pour the mix into the mold, vibrating it thoroughly to eliminate trapped air bubbles.
    4. Let it cure undisturbed for 72 hours.
    5. Demold the cast and wet-grind the surface with diamond polishing pads (starting at 60-grit up to 1500-grit) to expose the cross-sections of the colorful marble chips.
    6. Apply an impregnating stone and concrete sealer to lock out moisture.
    7. Mount to the wall using a heavy-duty concealed French cleat embedded during casting.
  • Tips and Variations:
    • Variation 1: Cast the medallion with half smooth pigmented charcoal concrete and half terrazzo for a two-tone look.
    • Variation 2: Inset a polished circular mirror into the center to combine art with functionality.
    • Mounting Safety: Use masonry anchors rated for the specific weight of your cast stone medallion.

9. High-Gloss Epoxy Abstract Ocean Geode Resin Pour

Fluid resin art introduces sweeping natural currents, liquid depth, and vibrant ocean hues.

  • Introduction: High-gloss epoxy resin art mimics the swirls of coastal waters and cut mineral geodes. The glass-smooth, non-porous finish makes it completely waterproof and naturally suited for modern bathroom environments.
  • What This Idea Means: This style introduces dynamic fluid motion to break up the rigid grid lines of tiled walls. Deep navy, seafoam green, translucent turquoise, and bright white lacing mirror the presence of water throughout the room.
  • How to Make It:
    1. Prep an MDF circular art panel or cradle board by coating it with white gesso and leveling it on your work table.
    2. Mix clear two-part casting epoxy resin with pigment pastes: deep indigo, sea-glass green, soft aqua, and metallic champagne.
    3. Pour the colored resin in flowing, organic rivers across the board, allowing the shades to blend naturally.
    4. Drizzle a line of white resin mixed with isopropyl alcohol along the color transitions.
    5. Pass a heat gun or blowtorch lightly across the surface on high heat to burst bubbles and push the white pigment into lacy, sea-foam patterns.
    6. Cover to prevent dust settling and cure for 24 hours until hard and reflective.
  • Tips and Variations:
    • Variation 1: Embed crushed raw quartz crystals and fine metallic glitter along the edges to create a geode look.
    • Variation 2: Use a monochrome palette of smoky black, cool gray, and silver leaf for an understated, modern tone.
    • Edge Prep: Sand and paint the outer cradle edges with waterproof satin black paint before pouring your resin.

10. Floating Framed Minimalist Japanese Washi Paper Collage

Layered handmade fibers showcase delicate translucency and subtle organic textures.

  • Introduction: Handcrafted Japanese washi papers (such as Kozo, Gampi, and Unryu) feature embedded bark fibers, deckled edges, and varied levels of translucency. Layering these artisanal papers inside float frames creates a serene, spa-like focal point.
  • What This Idea Means: Rooted in the Japanese aesthetic of Wabi-Sabi (appreciating beauty in imperfection), this artwork brings organic softness to sleek spaces. It pairs seamlessly with Japandi, Scandinavian, and warm minimalist interiors.
  • How to Make It:
    1. Select four to five sheets of handmade washi paper with varied textures: fibrous Unryu, raw Kozo, and light translucent Gampi.
    2. Carefully tear the paper along the natural grain to create soft, feathery deckled edges (dip a small brush in water along your tear lines for clean, controlled edges).
    3. Cut a heavy piece of archival off-white 400 gsm watercolor paper to serve as the mounting background.
    4. Arrange the torn washi pieces in an overlapping, asymmetrical, geometric composition.
    5. Adhere the papers using drops of wheat-starch paste or pH-neutral archival glue applied with a fine brush.
    6. Mount the finished piece inside a double-glass wooden float frame, allowing the wall color to show through the translucent margins.
  • Tips and Variations:
    • Variation 1: Paint a single, bold sumi-ink calligraphic brushstroke across one layer before assembly.
    • Variation 2: Inset delicate flakes of copper or silver leaf between two translucent sheets for a subtle metallic shimmer.
    • Frame Choice: Opt for pale natural ash, white oak, or bamboo framing to preserve the airy, organic aesthetic.
See also  21 Bathroom Tray Styling Tips

11. 3D Ribbed Wood Slat & Charcoal Painted Wave Relief

Rhythmic wood slats bring architectural depth, warmth, and dynamic shadows to flat surfaces.

  • Introduction: Three-dimensional wood slat art uses repeating vertical or curved profiles to cast changing shadows throughout the day. It bridges the gap between custom architectural wall paneling and framed fine art.
  • What This Idea Means: This idea adds depth and structure to plain painted drywall. The repeating slats bring order and visual rhythm, echoing the clean vertical lines of modern fluted vanities.
  • How to Make It:
    1. Cut a sturdy 12 mm birch plywood backing board to your preferred dimensions (e.g., 70 x 120 cm).
    2. Purchase half-round solid pine or oak dowel moldings, cutting them to varying lengths to form an undulating wave pattern across the panel.
    3. Sand each slat smooth using 220-grit sandpaper.
    4. Attach the slats to the backing board using waterproof wood glue and 18-gauge brad nails driven from the backside.
    5. Spray-paint the entire assembly in matte charcoal, deep olive, or warm bone using an HVLP paint sprayer for an even finish.
    6. Seal with a matte exterior-grade polyurethane clear coat to protect against moisture absorption.
  • Tips and Variations:
    • Variation 1: Leave every third slat in natural oiled teak or oak to introduce two-tone contrast.
    • Variation 2: Lay the slats diagonally or in a herringbone pattern to create dynamic movement.
    • Moisture Resistance: Always seal both the front and back of the backing board to prevent seasonal wood movement from bathroom steam.

12. Ultra-Large Minimalist Line Art Woman’s Silhouette

Fluid contour drawings celebrate the human form while maintaining a clean, minimalist footprint.

  • Introduction: Large-scale continuous line drawings celebrate the body through fluid, single-stroke linework. The open negative space keeps the art feeling light and expansive, even in compact powder rooms and cozy master bathrooms.
  • What This Idea Means: Line art brings human warmth into modern spaces without visual overload. Its expressive, sweeping curves balance the straight, rigid lines of tile joints, glass partitions, and plumbing fixtures.
  • How to Make It:
    1. Source a heavy, primed gallery-wrapped canvas measuring at least 90 x 120 cm.
    2. Paint the entire canvas with two coats of warm alabaster, soft beige, or greige matte paint.
    3. Sketch a single, continuous line drawing of a woman’s profile, back, or torso using a light watercolor pencil.
    4. Trace over the linework using high-flow acrylic fluid paint in deep black, raw umber, or bronze with a long-bristle rigger brush.
    5. Keep your brush pressure steady to maintain a clean, crisp line weight.
    6. Once dry, seal with two coats of non-yellowing satin water-based varnish.
  • Tips and Variations:
    • Variation 1: Bend 3 mm solid black-anodized aluminum wire into the profile shape and mount it 1.5 cm off the wall for real shadow lines.
    • Variation 2: Paint the background in two soft color-blocked geometric shapes before adding the single continuous line over top.
    • Scale Recommendation: Opt for large formats; an oversized canvas creates an intentional, gallery-like impact without clutter.

13. Symmetrical Moroccan Zellige Tile Mosaic Medallion

Handcrafted clay tiles bring rich artisanal glazes, subtle color shifts, and geometric heritage to modern walls.

  • Introduction: Hand-cut Moroccan Zellige tiles are prized for their subtle variations in tone, irregular surfaces, and hand-chiseled edges. Framing a curated mosaic medallion treats these artisanal tiles as fine art rather than standard backsplashes.
  • What This Idea Means: This concept combines ancient craftsmanship with clean, modern framing. The glossy, reflective surfaces bounce light around the room, adding warmth and visual interest to stark, neutral bathrooms.
  • How to Make It:
    1. Cut a rigid cement backer board (like HardieBacker) to fit inside a sturdy, deep-profile shadowbox frame.
    2. Arrange authentic 5 x 5 cm hand-cut Zellige tiles in an intricate geometric pattern (such as diamond stars or herringbone layouts).
    3. Mix thin-set mortar and apply it across the board with a 6 mm notched trowel.
    4. Press the tiles firmly into the mortar, keeping the grout lines ultra-tight (1 mm) as done in traditional Moroccan tilework.
    5. Allow the mortar to set for 24 hours.
    6. Grout the joints with a water-resistant, mold-resistant flexible epoxy grout, wiping clean with a damp sponge.
    7. Frame in an oiled walnut shadowbox with an internal moisture barrier.
  • Tips and Variations:
    • Variation 1: Mix emerald green and bone white tiles for a bold, traditional contrast.
    • Variation 2: Use monochrome pearl-white tiles to create interest purely through light bouncing off the hand-chiseled facets.
    • Weight Consideration: Secure the framed tile panel directly into wall studs using heavy-duty, interlocking Z-bar brackets.

14. Acrylic-Encased Dried Palm Fronds & Sun-Bleached Flora

Suspended botanicals bring sculptural, natural forms inside a clean acrylic case.

  • Introduction: Preserving dried architectural botanicals—such as sun-bleached spear palms, pampas plumes, and bleached fan fronds—inside clear acrylic boxes offers an airy, three-dimensional take on botanical art.
  • What This Idea Means: This style celebrates raw, organic silhouettes while sealing delicate plant fibers inside a protective, moisture-proof case that stands up to daily humidity.
  • How to Make It:
    1. Gather dried, sun-bleached botanicals (such as trimmed palm spears, lunaria seed pods, and bunny tail grass).
    2. Source a custom clear acrylic (Plexiglas) shadow box with a removable back panel.
    3. Paint the interior back panel soft bone or natural linen white using moisture-resistant paint.
    4. Carefully arrange the botanicals in a balanced, minimalist composition, layering larger fan palms behind delicate seed pods.
    5. Secure the stems to the backing board using small drops of clear archival silicone adhesive or invisible monofilament nylon thread.
    6. Seal the acrylic cover over the backing board with clear acrylic solvent cement to create a dust- and moisture-proof seal.
  • Tips and Variations:
    • Variation 1: Spray the dried botanicals in matte white or gold paint for a stylized, monochrome look.
    • Variation 2: Use a double-sided clear acrylic frame with no solid backing, letting your bathroom wall or tile pattern show through.
    • Cleaning Tip: Clean acrylic panels with dedicated anti-static acrylic cleaner and a microfiber cloth to prevent fine surface scratches.

15. Oversized Abstract Neutral Watercolor on Textured Arches Paper

Soft, atmospheric watercolor washes bring calm, spa-like energy to modern bathroom spaces.

  • Introduction: Fluid watercolor washes on heavy textured paper introduce gentle movement and understated elegance. The soft color transitions mimic drifting clouds, misty mornings, or flowing water, setting a restorative mood.
  • What This Idea Means: This concept softens the hard surfaces and sharp angles of modern bathrooms. The translucent, layered washes of color create visual calm without demanding overwhelming focus.
  • How to Make It:
    1. Stretch a full sheet of 640 gsm rough-grain Arches 100% cotton watercolor paper over a sturdy wooden drawing board with paper tape.
    2. Generously mist the paper with clean water using a spray bottle until the surface is evenly damp.
    3. Mix professional watercolor pigments in soft earth tones: raw umber, warm sepia, slate gray, and subtle ochre.
    4. Apply broad, sweeping strokes across the damp surface using a large Japanese hake brush, letting the colors feather and bloom naturally.
    5. Tilt the board gently to guide the pigment flow, then let it air-dry completely over 24 hours.
    6. Mount with the torn deckled edges visible within a natural wood float frame behind UV-filtering glass.
  • Tips and Variations:
    • Variation 1: Add a fine ribbon of genuine liquid gold pigment along the edge of a dry color wash for a subtle touch of luxury.
    • Variation 2: Blend soft maritime tones like sea-salt gray, dusty sage, and misty cerulean for coastal spaces.
    • Framing Note: Always ensure the paper does not touch the glass directly; use an archival matboard or float spacers to prevent condensation buildup.
See also  21 Bathroom Tray Styling Tips

16. Modern Minimalist Typographic Bathing & Wellness Quote

Refined typography and clean layouts turn inspirational phrases into sleek, contemporary wall decor.

  • Introduction: Typographic art pairs meaningful words with clean, modern graphic layouts. Using elegant serif or sans-serif fonts alongside generous negative space, these prints reinforce wellness rituals and calm moments.
  • What This Idea Means: This approach adds a contemporary, editorial touch to your space. It transforms positive affirmations and bathing reflections into graphic elements that complement modern vanity designs.
  • How to Make It:
    1. Choose a meaningful phrase, architectural definition, or minimalist poem focused on rest, water, or mindfulness.
    2. Typeset the phrase using a clean font family (such as a high-contrast Didone serif or an airy Swiss sans-serif) in Adobe Illustrator or Canva.
    3. Position the text intentionally on the canvas, using ample negative space with wide margins.
    4. Print the design on heavy 350 gsm fine-art matte paper with waterproof archival inks.
    5. Frame the print inside an ultra-slim matte black metal or brushed-nickel frame with an extra-wide 10 cm archival white matboard.
  • Tips and Variations:
    • Variation 1: Print the typography on frosted, translucent acrylic panels for an airy, contemporary finish.
    • Variation 2: Try a rich inverted palette: a solid charcoal-black background with crisp off-white or metallic silver lettering.
    • Layout Tip: Keep phrases brief; 3 to 8 thoughtful words create a cleaner, more impactful graphic statement than dense paragraphs.

17. Framed Backlit Perforated Metal Acoustic Art Panel

Concealed ambient backlighting and perforated metals turn a wall panel into a functional light sculpture.

  • Introduction: This wall art concept combines sound absorption, industrial metals, and warm ambient illumination. Perforated metal sheets backed by acoustic felt dampen room echoes while casting a soft halo of light across surrounding tiles.
  • What This Idea Means: Modern, tile-heavy bathrooms can feel bright and reverberant. This installation addresses both sound and light, serving as an acoustic damper by day and a calming nightlight in the evening.
  • How to Make It:
    1. Build a shallow 4 cm deep rectangular wooden frame box from solid pine or aluminum profiles.
    2. Line the interior backing with 12 mm dense PET acoustic felt paneling in charcoal black.
    3. Install a continuous strip of warm-white (2700K) waterproof IP67-rated LED tape around the interior frame perimeter, facing inward.
    4. Cover the front with a laser-cut perforated aluminum sheet featuring a geometric, micro-hole, or slotted architectural design.
    5. Powder-coat the front metal panel in matte bronze, textured black, or warm cream.
    6. Wire the LED strip to your vanity lighting switch or a dedicated dimmable wall circuit.
  • Tips and Variations:
    • Variation 1: Cut organic rippled water patterns into the metal using precision laser cutting.
    • Variation 2: Swap the metal sheet for fluted smoked acrylic to produce soft, diffused horizontal light bars.
    • Safety Note: Ensure all low-voltage LED drivers and electrical connections follow local wet-zone building codes.

18. Organic Carved Travertine Stone Relief Plaque

Natural travertine reliefs celebrate raw mineral veining, sculptural depth, and timeless stone artistry.

  • Introduction: Travertine brings tactile character through its natural pits, earthy tones, and porous veining. A wall-hung carved stone relief introduces refined organic texture that pairs naturally with luxury stone vanities and plaster finishes.
  • What This Idea Means: Stone artwork feels grounded, permanent, and architectural. It bridges the gap between raw natural quarries and refined modern surfaces, adding authentic earthy texture to the room.
  • How to Make It:
    1. Source a 30 x 60 cm slab of unfilled, raw vein-cut Roman travertine (2 cm thick).
    2. Sketch abstract flowing curves, overlapping arches, or geometric steps onto the stone surface.
    3. Carve shallow channels and recessed planes into the stone using a hand-held angle grinder fitted with diamond masonry carving burs and chisels (always wear proper PPE and use water suppression).
    4. Soften the carved edges with 120-grit wet diamond hand-polishing pads.
    5. Clean away dust, let the slab dry, and seal with a breathable, penetrating matte stone sealer.
    6. Secure rear mounting brackets directly into the stone using two-part anchoring epoxy, then mount with heavy-duty wall anchors.
  • Tips and Variations:
    • Variation 1: Mix unfilled beige travertine with deep charcoal basalt stone across an interconnected two-piece diptych.
    • Variation 2: Fill a few carved grooves with matte white mineral plaster to create clean textural contrast.
    • Weight Verification: Verify wall anchor ratings before installation; solid stone reliefs require sturdy anchoring into wall studs or solid masonry.

19. Scandinavian Hand-Dipped Indigo & Clay Canvas Tapestry

Hand-dipped textiles create soft, atmospheric gradient ombré washes on heavy natural canvas.

  • Introduction: Scandinavian dip-dyed banners celebrate natural color gradients and relaxed textile draping. Combining deep plant-derived indigo or mineral-rich terracotta clays with heavy unbleached canvas brings an earthy, grounding touch to modern walls.
  • What This Idea Means: This concept balances structured bathroom layouts with soft, organic gradients. The hanging fabric introduces movement and casual warmth that complements light wood vanities and matte white fixtures.
  • How to Make It:
    1. Cut a length of heavy 16 oz unbleached cotton duck canvas with raw, intentionally frayed edges.
    2. Prepare an organic natural indigo dye vat or an iron-rich terracotta clay bath in a wide, shallow tub.
    3. Dip the lower third of the damp canvas into the dye bath for 15 minutes.
    4. Gradually raise the fabric out of the dye in stages to create a smooth, blended ombré gradient from deep color to natural canvas.
    5. Rinse the canvas thoroughly in cold water until the runoff is clear, then let it air-dry flat.
    6. Mount the top edge between two magnetic solid oak hanging rails, suspended with a genuine leather cord.
  • Tips and Variations:
    • Variation 1: Dip both the top and bottom ends in different botanical baths (like walnut brown and slate indigo) so they blend in the middle.
    • Variation 2: Sew subtle horizontal pleats across the canvas before dipping to create clean geometric resist lines.
    • Fabric Treatment: Spray the dried canvas with an invisible textile fabric protector to guard against splashes and daily humidity.

20. Contemporary Color-Blocked Stained Glass Suncatcher Panel

Traditional stained glass reimagined with bold mid-century geometric shapes and modern textured glass.

  • Introduction: Modern stained-glass art steps away from complex historical scenes in favor of clean color-blocking, varied glass textures, and bold lead lines. Hung in front of a window or mounted slightly off a light wall, it casts colorful reflections throughout the room.
  • What This Idea Means: This idea transforms available bathroom light into an active design feature. The interplay between reeded glass, amber tints, and bottle-green planes brings dynamic warmth to tiled spaces.
  • How to Make It:
    1. Design an abstract geometric cartoon featuring half-circles, intersecting rectangles, and slim archways.
    2. Cut specialty art glass sheets (including reeded, hammered, water-glass, and tinted architectural panes) to match the pattern shapes.
    3. Wrap the edges of every glass piece with self-adhesive copper foil tape, burnishing it down firmly.
    4. Assemble the pieces on a heat-proof board, brush with flux, and solder the seams together using a 60/40 lead-tin solder iron.
    5. Frame the panel with a rigid zinc U-channel perimeter frame, soldering two secure brass hanging rings to the top corners.
    6. Clean thoroughly, apply black patina chemical to darken the solder lines, and seal with carnauba glass wax.
  • Tips and Variations:
    • Variation 1: Stick to entirely clear textured glasses (reeded, ribbed, and seeded) for a chic monochrome look that focuses on refracting light.
    • Variation 2: Hang the panel directly in front of a bathroom privacy window to turn plain frosted glass into a decorative focal point.
    • Mounting Check: Always secure stained glass with sturdy brass chains anchored to solid structural frames rather than suction cups.