Spread the love

Transforming your bathroom into a warm, inviting sanctuary doesn’t require a complete structural overhaul or an expensive renovation. By leaning into the timeless charm of rustic aesthetics, you can turn ordinary storage challenges into stylish design opportunities. Rustic design thrives on authentic textures, reclaimed materials, warm wood grains, forged iron, and an organic sense of lived-in comfort. When paired with smart organization, these elements cut through the daily clutter, replacing chaotic countertops with curated, serene spaces that feel like a high-end mountain cabin or a pastoral French farmhouse retreat.

Achieving this look is about more than just hiding your belongings away in plastic bins; it is about celebrating natural materials and finding clever ways to display or store essentials. Whether you are working with a sprawling master bath or a cozy powder room, incorporating rustic organization hacks adds character, warmth, and much-needed functional capacity. From repurposed vintage ladders and wire baskets to custom wooden ledges and mason jar dispensers, every single detail contributes to a cohesive, gorgeous atmosphere.

Below are 20 aesthetic, amazing, gorgeous, and cozy rustic bathroom organization hacks complete with step-by-step instructions on how to make them, variations to suit your unique style, and the essential materials needed to bring each vision to life.

1. Reclaimed Wood Floating Shelves with Iron Brackets

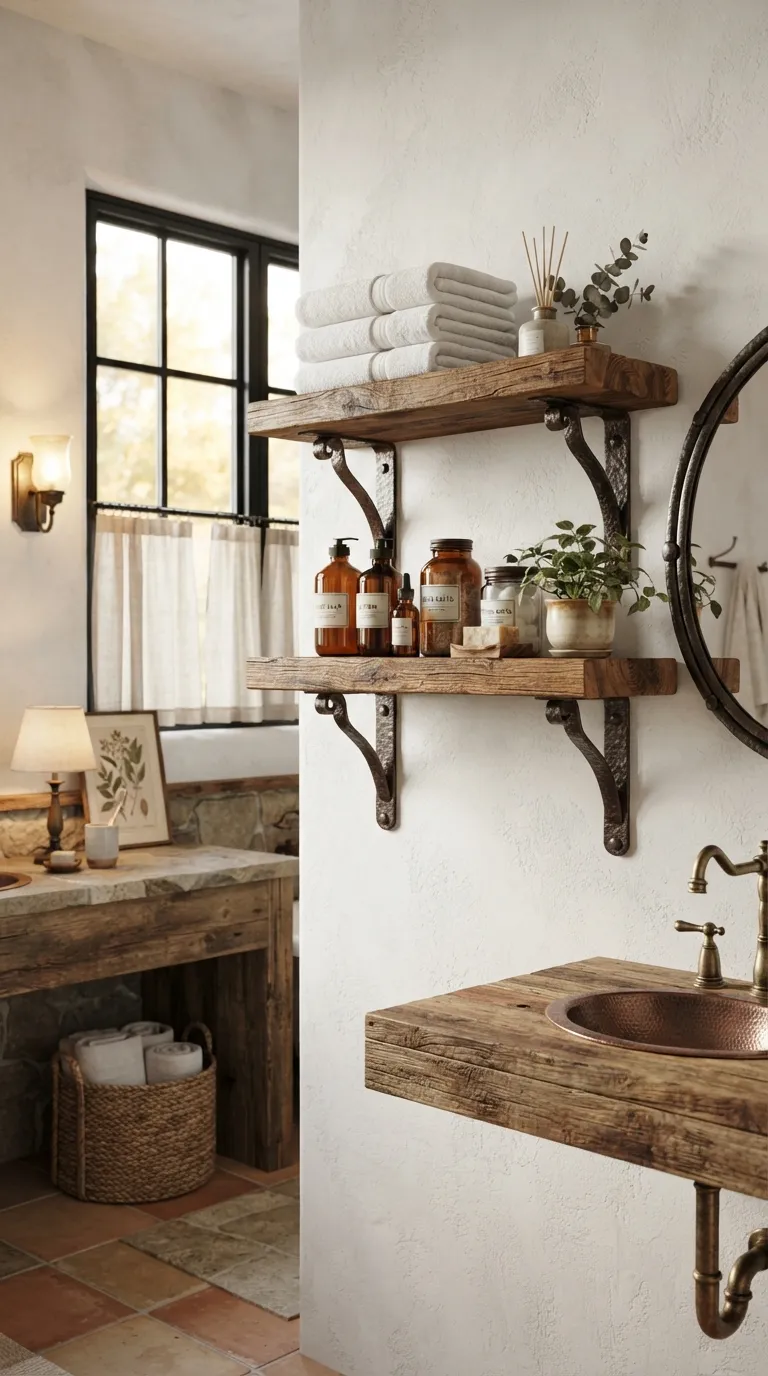
Unused wall space is one of the greatest missed opportunities in a small bathroom. Installing chunky, reclaimed wood floating shelves supported by heavy-duty black iron brackets instantly introduces raw texture while clearing off crowded countertops. These shelves provide the perfect stage for folded washcloths, glass jars filled with cotton balls, and small potted succulents.

  • How to Make It: Source a thick piece of reclaimed barn wood or scaffolding plank cut to your desired length. Sand the surface thoroughly to remove any splinters while preserving the natural weathering, knots, and grain patterns. Apply a matte clear polyurethane or a warm-toned wood stain to seal the wood against moisture. Secure heavy iron brackets into wall studs using heavy-duty anchors, then screw the wooden plank securely onto the brackets from underneath.
  • Tips and Variations: If you prefer a lighter, more modern rustic look, use light pine treated with a white-wash stain. For an industrial edge, paint the brackets a matte black or distressed bronze.
  • Needs to Make That Thing: Reclaimed wood board, 2 industrial iron brackets, wood screws, wall anchors, sandpaper, wood stain or sealer, power drill, and a level.
2. Vintage Wooden Ladder Towel Rack

Leaning an old wooden orchard or hay ladder against an empty bathroom wall offers vertical storage for towels without requiring permanent wall installation. The weathered rungs provide ample space to hang bath sheets, hand towels, and even small baskets for extra toiletries.

  • How to Make It: Find a vintage wooden ladder or build one using dimensional lumber cut down to size. Clean the wood thoroughly and sand down any rough patches. If the ladder is painted and chipping, seal it with a clear matte topcoat to lock in the vintage patina. Secure rubber or felt pads to the bottom feet and the top leaning points to protect your walls and floors from scratches.
  • Tips and Variations: Wrap fairy lights or faux eucalyptus garlands around the side rails to add a soft, organic glow and an extra layer of rustic charm.
  • Needs to Make That Thing: Vintage wooden ladder (or 2 vertical poles and 5 rungs), fine-grit sandpaper, clear matte sealant, soft protective pads, and optional decorative garlands.

3. Mason Jar Wall Mount Storage Sconces

Mason jars are a staple of rustic decor, and mounting them to distressed wooden backing boards creates a charming organizational display for makeup brushes, toothbrushes, or cotton swabs. This hack keeps your daily essentials within arm’s reach while adding farmhouse flair to blank walls.

  • How to Make It: Cut a rectangular piece of cedar or pine wood to your preferred dimensions and stain it in a rich espresso or weathered gray shade. Attach stainless steel or galvanized hose clamps vertically to the board using short screws. Slide wide-mouth mason jars into the clamps and tighten them securely. Mount the entire wooden board to the wall using picture-hanging hardware.
  • Tips and Variations: Paint the exterior of the mason jars in pastel chalk paint and distress the edges with sandpaper for a shabby-chic variation.
  • Needs to Make That Thing: Wooden board, 3 wide-mouth mason jars, 3 metal hose clamps, wood stain, screws, screwdriver, and wall-mounting hardware.

4. Chicken Wire Cabinet Door Inserts

If your bathroom vanity features plain recessed-panel cabinet doors, swapping out the center panels for rustic chicken wire instantly lightens the visual weight of the furniture and adds immediate country charm while keeping extra toilet paper and cleaning supplies breathable and visible.

  • How to Make It: Remove your bathroom vanity cabinet doors from their hinges. Carefully cut out the flat center panel of each door using a jigsaw or router, leaving the outer frame intact. Measure the opening and cut a piece of galvanized chicken wire to size using heavy-duty wire cutters. Staple the chicken wire securely to the back recess of the door frame, and finish the raw edges with thin wooden quarter-round molding. Reattach the doors.
  • Tips and Variations: Spray paint the chicken wire matte black for a modern farmhouse aesthetic, or leave it galvanized for a traditional industrial-rustic look.
  • Needs to Make That Thing: Vanity doors, jigsaw, galvanized chicken wire, heavy-duty wire cutters, staple gun, thin wood molding, finishing nails, and paint or stain.
See also  Erich Lejeune Vermögen: Kinder, Eltern, Partner, Alter, Größe

5. Galvanized Bucket Toilet Paper Dispenser

Storing extra rolls of toilet paper can be awkward, but placing them inside a tall, vintage-style galvanized metal bucket or milk churn sitting right beside the toilet turns a utilitarian necessity into a charming decorative accent.

  • How to Make It: Select a tall, cylindrical galvanized steel bucket or small milk can that fits your bathroom scale. Line the interior with a clean canvas liner if the metal has any rough interior edges. Stack extra toilet paper rolls vertically inside the bucket, allowing the top roll to sit easily within arm’s reach for guests.
  • Tips and Variations: Attach a small chalkboard label hanging from jute twine around the handle that reads “Fresh Rolls” or “Take One.”
  • Needs to Make That Thing: Tall galvanized metal bucket or milk churn, clean canvas liner (optional), extra toilet paper rolls, and a small decorative label.

6. Driftwood Bath Tray for Tub Organization

Transform your soaking tub into a luxury spa retreat with a custom driftwood or live-edge wooden bath caddy. It holds your book, a cup of tea, and a bar of artisan soap right where you need them while adding organic, coastal-rustic texture.

  • How to Make It: Find a sturdy, flat piece of cured driftwood or a live-edge hardwood slab that spans the width of your bathtub with a few inches of overhang on each side. Clean and debark the wood completely, then sand it smooth to prevent splinters. Apply several coats of a waterproof marine varnish to protect the wood from standing water and humidity. Add small wooden blocks underneath the edges to act as stoppers preventing the tray from sliding into the tub.
  • Tips and Variations: Drill a small circular depression into the wood to hold a candle securely, or carve a narrow groove to prop up a tablet.
  • Needs to Make That Thing: Driftwood slab or live-edge wood, marine-grade waterproof varnish, sandpaper, small wooden stoppers, and wood glue.

7. Rustic Wire Basket Drawer Organizers

Banish drawer clutter by swapping out modern plastic dividers for miniature rustic wire baskets. They bring texture and order to vanity drawers, keeping makeup, hair ties, and skincare products neatly corralled.

  • How to Make It: Measure the interior dimensions of your bathroom vanity drawers. Purchase small wire or woven seagrass baskets that fit snugly side by side within the drawer space. Sort your bathroom items into categories and place them into the designated wire baskets.
  • Tips and Variations: Attach tiny metal clip labels to the front of each basket so you can easily identify what is stored inside without digging around.
  • Needs to Make That Thing: Miniature wire or seagrass baskets, tape measure, and optional mini metal label clips.

8. Industrial Pipe and Wood Toilet Paper Holder

Combine raw steel plumbing pipes with a warm wooden mounting block to create a sturdy, industrial-rustic toilet paper holder that stands out from standard chrome fixtures.

  • How to Make It: Cut a small square of dark-stained pine to serve as the wall anchor block. Assemble a short run of black iron plumbing pipes consisting of a floor flange, a short nipple, an elbow, and another nipple capped off to hold the toilet paper roll. Screw the iron flange securely onto the wooden block, then mount the entire assembly to the bathroom wall.
  • Tips and Variations: Use copper pipes instead of black iron for a warmer, brighter metallic hue that pairs beautifully with softer rustic decor.
  • Needs to Make That Thing: Black iron plumbing flange, pipes and elbow fittings, small pine block, wood stain, mounting screws, and a drill.

9. Woven Seagrass Hamper with Lid

A durable, natural fiber laundry hamper keeps dirty towels out of sight while anchoring the room’s earthy aesthetic. Woven materials like seagrass, water hyacinth, or rattan add tactile warmth to sterile tiled bathroom floors.

  • How to Make It: Purchase a large, structured woven hamper featuring an integrated lid and a breathable cotton interior liner. Position the hamper in an empty corner of the bathroom to collect daily towels and robes.
  • Tips and Variations: Choose a hamper with built-in side handles for easy transport on laundry day, or look for a two-compartment hamper to pre-sort lights and darks.
  • Needs to Make That Thing: Large woven seagrass hamper with lid and removable cotton laundry bag liner.
See also  Anne Menden Alter: Vermögen, Größe, Kinder, Eltern, Partner

10. Repurposed Wooden Crate Medicine Cabinet Cubbies

Instead of a standard flat mirror cabinet, mount vintage wooden crates onto the wall on their sides to create open, multi-compartment shelving units that serve as a rustic alternative for daily toiletries.

  • How to Make It: Obtain two or three shallow wooden crates (such as old apple or wine crates). Sand the surfaces gently and seal with a clear coat. Mount the crates securely to the wall studs using heavy-duty screws through the back panels, arranging them in an overlapping or stacked configuration. Use the interior shelves and the top surfaces to store folded hand towels, perfumes, and daily essentials.
  • Tips and Variations: Wallpaper the back interior panel of each crate with a botanical or vintage newspaper print pattern before mounting for an unexpected pop of design.
  • Needs to Make That Thing: 2-3 wooden crates, wood sealer, sandpaper, wall anchors, screws, and optional decorative paper.

11. Leather Strap Wall Mirror with Wooden Peg

Mirrors are essential in bathrooms, but standard frameless models lack character. Hanging a round mirror using thick, rustic leather straps from a handcrafted wooden peg introduces equestrian and farmhouse warmth to your vanity space.

  • How to Make It: Purchase a round mirror with a thin frame or backing. Cut a long strip of genuine heavy-weight leather to create a suspension loop that cradles the mirror securely. Secure the ends of the leather strap to the back of the mirror frame with heavy-duty rivets or industrial adhesive. Hang the loop over a large, decorative wooden wall peg anchored firmly into a stud.
  • Tips and Variations: Use a dark distressed brown leather strap for an antique look, or a lighter tan leather for a Scandinavian-rustic fusion style.
  • Needs to Make That Thing: Round mirror, heavy leather strap, rivets, heavy-duty wood peg, wall anchor, and screw.

12. Peg Rail Towel and Robe Station

Shaker-style wooden peg rails running along a bathroom wall offer endless hanging flexibility for bathrobes, wet towels, and brush bags while keeping the floor plan feeling open and uncluttered.

  • How to Make It: Cut a long, flat board of poplar or pine to fit the length of your wall space. Drill evenly spaced holes along the board and insert pre-made shaker pegs, securing them with wood glue and screws from the back. Sand the entire rail and finish it with a coat of historic milk paint or a natural wax finish. Mount the rail securely to multiple wall studs.
  • Tips and Variations: Paint the peg rail in a moody sage green or deep charcoal to ground a neutral bathroom with subtle color.
  • Needs to Make That Thing: Long wooden board, shaker pegs, wood glue, screws, sandpaper, milk paint or wax, and a drill.

13. Stained Wood Trays for Sink Countertops

Countertop clutter is the enemy of a serene bathroom. Grouping soaps, lotion bottles, and toothbrushes together on a low-profile stained wooden tray instantly transforms a chaotic collection into a curated display.

  • How to Make It: Cut a small, rectangular piece of scrap hardwood or use a small cutting board with a handle. Sand the edges until smooth and apply a rich walnut or teak oil to bring out the natural wood grain while making the surface water-resistant. Add tiny felt pads to the four bottom corners to protect your quartz or marble vanity top.
  • Tips and Variations: Carve shallow circular indents into the wood surface to hold soap dispensers and lotion bottles securely in place.
  • Needs to Make That Thing: Small wooden board or platter, fine sandpaper, walnut or teak oil, and small adhesive felt feet.

14. Cast Iron Hook and Barn Wood Jewelry Organizer

If you remove your rings, bracelets, and necklaces before washing your face or stepping into the shower, a rustic jewelry organizer mounted near the sink prevents jewelry from getting lost down the drain.

  • How to Make It: Take a narrow strip of weathered barn wood and attach several ornate cast iron or bronze hooks along its face. Screw small brass cup hooks into the bottom edge of the board to hang delicate necklaces and chains. Mount the finished piece securely to the bathroom wall next to the mirror.
  • Tips and Variations: Add a small shallow wooden ledge above the hooks to hold a ring dish for quick placement.
  • Needs to Make That Thing: Weathered wood strip, cast iron hooks, brass cup hooks, mounting screws, and a screwdriver.
See also  Jana Wagenhuber Vermögen: Partner, Alter, Kinder, Eltern, Größe

15. Tiered Wire Basket Stand for Toiletries

Free up valuable counter space by introducing a freestanding tiered metal basket stand. These multi-level units tuck neatly into a corner and provide vertical storage for extra soaps, lotions, and washcloths.

  • How to Make It: Choose a freestanding 2-tier or 3-tier rustic wire basket stand with a distressed bronze or galvanized finish. Assemble the stand according to the manufacturer’s instructions. Position the stand in an empty corner of the room or next to the vanity.
  • Tips and Variations: Place small potted plants or amber glass soap bottles on the top tier to elevate the visual styling.
  • Needs to Make That Thing: Tiered wire basket stand and basic assembly tools.

16. Reclaimed Wood Bath Mat

Step out of the shower onto a slatted wooden bath mat instead of a soggy fabric rug. It adds a spa-like, rustic resort feel to the floor while drying quickly and resisting mildew.

  • How to Make It: Cut several uniform slats of rot-resistant cedar or teak wood to equal lengths. Lay the slats parallel with small equal gaps between them, and screw them into two cross-support wooden runners on the bottom using stainless steel screws. Sand all edges smooth and finish with a water-repellent teak oil.
  • Tips and Variations: Add rubber anti-skid strips to the bottom runners to ensure the mat stays securely in place on wet tile floors.
  • Needs to Make That Thing: Cedar or teak slats, stainless steel screws, sandpaper, teak oil, and anti-skid rubber strips.

17. Floating Wood Vanity Shelf for Baskets

In bathrooms with pedestal sinks lacking cabinet storage, building a custom floating shelf underneath the sink basin creates a hidden storage shelf for extra towels stored inside woven baskets.

  • How to Make It: Measure the space beneath your pedestal sink around the plumbing trap. Cut a heavy wooden board with a custom cutout notch that fits snugly around the pedestal pipe. Support the shelf with heavy-duty hidden shelf brackets anchored into the wall behind the pedestal. Place flat woven baskets filled with toiletries underneath.
  • Tips and Variations: Use a live-edge slab for the shelf to maximize the rustic contrast against a sleek white porcelain pedestal basin.
  • Needs to Make That Thing: Thick wooden board, jigsaw for cutting pipe notches, heavy-duty hidden shelf brackets, wall anchors, and woven baskets.

18. Woven Seagrass Waste Basket

Even the trash can should contribute to the room’s aesthetic. Replace sterile plastic bins with a tightly woven seagrass or water hyacinth waste basket that blends seamlessly into a rustic color palette.

  • How to Make It: Select a tapered or cylindrical woven natural fiber waste basket that matches the tone of your other storage baskets and hamper. Place it discreetly beside the vanity or toilet.
  • Tips and Variations: Line the interior with a small paper or biodegradable liner bag to keep the natural weave clean and protected from damp debris.
  • Needs to Make That Thing: Woven seagrass waste basket and compatible liners.

19. Wooden Peg Board for Custom Storage Layouts

A large wooden peg board mounted on the wall allows you to dynamically rearrange shelves, pegs, and hanging baskets as your storage needs change over time.

  • How to Make It: Cut a large sheet of thick plywood to your desired wall dimension. Drill a precise grid of holes across the entire board using a drill press or template. Cut matching wooden dowels to act as movable pegs, and build small matching wooden boxes that can hang directly off the pegs. Mount the pegboard to wall spacers to allow clearance for pegs, and finish with a clear matte sealant.
  • Tips and Variations: Paint the background board in a soft neutral beige while leaving the pegs and shelves in a natural wood finish for contrast.
  • Needs to Make That Thing: Plywood sheet, spade drill bit or drill press, wooden dowels, scrap wood for small shelves, mounting spacers, and clear sealant.

20. Vintage Amber Glass Dispenser Bottles

Ditch mismatched plastic soap and shampoo bottles by decanting your products into reusable amber glass bottles equipped with rustic bronze or matte black pump tops and minimalist waterproof labels.

  • How to Make It: Purchase a set of heavy amber glass bottles with stainless steel or bronze pump heads. Print or write custom waterproof vinyl labels designating “Hand Soap,” “Lotion,” and “Body Wash.” Fill the bottles with your favorite products and line them up on your sink tray or shower ledge.
  • Tips and Variations: Use clear glass bottles filled with Epsom salts and dried lavender buds for decorative bath soak storage alongside your soap dispensers.
  • Needs to Make That Thing: Amber glass bottles with pump dispensers, waterproof labels, and bath products.